 |
| @Lovedbylizzi |
THERE IS A NEW ACCESSORY IN TOWN
Disclaimer: The personalised iPhone case featured in this blogpost was gifted to me as part of a collaboration with CaseApp. This was for some social media content on Instagram, however I loved it so much and was so pleased with it, I wanted to share with you how I went about designing it. So this blogpost is not a sponsored post.
When you first arrive onto the CaseApp website you get the option to either have a go at designing your own personalised iPhone case (or another type of smart phone, sorry I only deal in the currency of Apple, LOL!) or you can choose from a selection of designs, such as marble, floral, tropical, girl power themes or as simple as dots and stripes, just to name a few.
From what I can see you can also pick a design from one of the categories and then add some of your own to it, like a quote or your name.
I had never designed my own iPhone case and really liked the idea of personalising just for me; you must have been to a few parties or social gatherings where you are unsure sometimes who's phone is who's? Well I wanted to make sure that it said 'Lizzi' all over it! Probably no surprises there!
HOW I DESIGNED MY PERSONAL IPHONE CASE
When you first land on the website you get the option to 'create your case', you then need to select the phone that you have. I should imagine that most of the designs are the same, but the measurements just differ depending on you own phone.
Once you select your own phone, it will then go into a new screen with a blank white phone, this should look like your own phone.
On the right-hand side you will have menu bar that gives you various options, like to upload the one image, add text or change the colour of the background. On this bar there is also an option called Collage and it is within here that you will find the templates for adding multiple images. Which is what I did.
For the my own design, I selected Collage and then picked the following template; this was after a lot of playing with the other templates. I selected this one as part of my final design because I had worked out you could see my own images better as the sections were larger, basically the more sections you have only a small amount of the image you upload will show.
 |
| Template design from CaseApp |
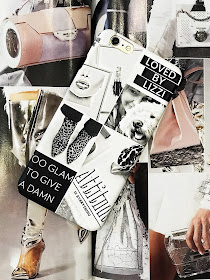
I then went through all my photos on my iPhone, now believe me as an instagrammer I have a lot of them! After playing around with various photos I opted for my flatlays that I do, along with a photo of my gorgeous dog Alfonso and I was keen to get Loved by Lizzi on there too.
I could have kept my images in their original colours, but I think you'll find that once they were put together the tone would not have flowed so well. A good trick is to make everything black and white; this gives an even tone throughout the design and I feel makes the end result more contemporary, stylish and chic, and a little less 'homemade'!
To not lose any of your original photos, I recommend to duplicate your photo on the iPhone, then go to the duplication to edit it to black and white, making sure you save your changes.
Once you have all your photos play around with them, and decide on which photo goes into each section. I doubt you'll get it right first time, so don't get cranky with it just give yourself more time to play with it.
Once you get all the photos into the right place you then need to decide if you want a matt or glossy finish. I've had numerous cases that are glossy, and so I opted for matt this time, and was really pleased with the results, it's looks very much like a magazine finish - and I like that.
I was truly impressed with the whole process, I found it very easy to do and at a price of £22, I thought that was a fab price too for personalisation. I opted to have free delivery so didn't pay for Express, and it arrived within 4 to 5 days in a lovely CaseApp material pouch.
READERS OFFER
My instagram community have an offer of 20% off until 28th February, I don't see why you can't benefit from this too. Simply use the discount code LIZZI20 before the 28th February 2019.
If you do create your own design, then please do share on your Facebook or Instagram and tag me @lovedbylizzi and @caseapp in - we would love to see what you have created!
The post HOW I DESIGNED MY PERSONALISED IPHONE CASE WITH CASEAPP was on Loved By Lizzi first.

